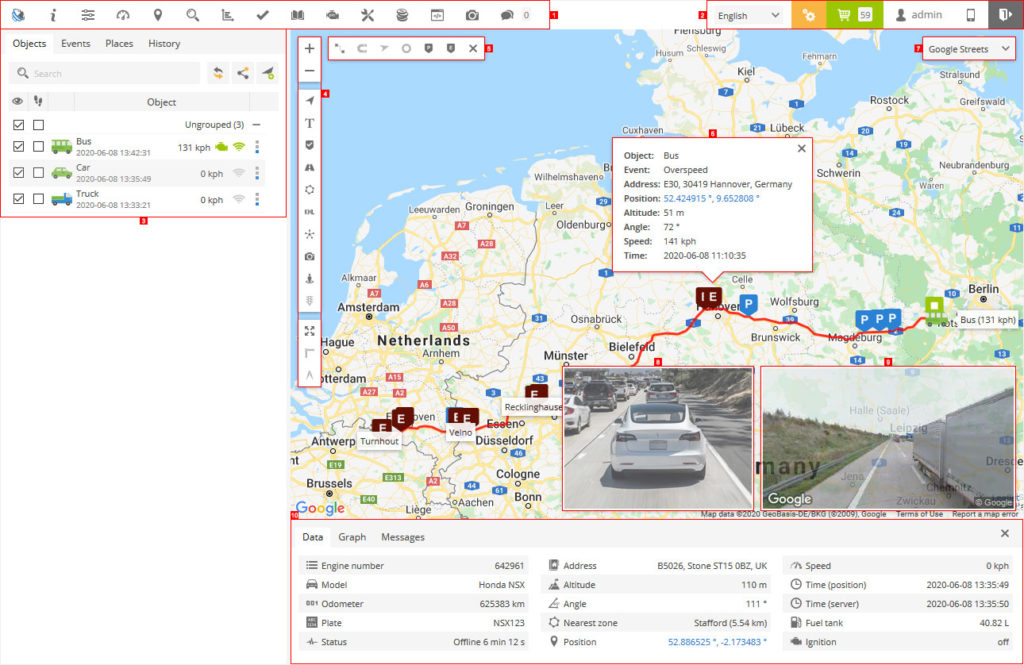
After login you will be redirected to the main page. Main page allows to access most common tracking features and settings, monitor object location on map, get detailed information: speed, coordinates, address, movement history, events, reports and more.

- Top panel – this panel provides access to: Help, Settings, Show point, Search address, Reports, Logbook, DTC, Object control, Image gallery and Chat.
- User account panel – this panel provides access to: Language selection, Billing, My account, Mobile version and Log out.
- Left panel – this panel provides access to: Object list, Events, Places (Markers, Routes, Zones) and History.
- Map controls
- Map zoom control – changes map zoom level.
- Objects – enable/disable object visibility.
- Labels – enable/disable object labels.
- Markers – enable/disable marker visibility.
- Routes – enable/disable route visibility.
- Zones – enable/disable zone visibility.
- KML –
- Clusters – a useful feature for those who has large number of objects and markers. Clusters split markers and objects into groups, which according to map zoom level will reveal content inside of it.
- Camera – show the last available object image.
- Street view – enable/disable street view.
- Live traffic – shows status of traffic on map (available only with Google Maps).
- Fit objects on the map – sets the map zoom level to fit all objects.
- Ruler – measures the distance between points.
- Measure area – measures area.
- Route controls – enable/disable loaded history route features.
- Object details – the most important information about selected object is show in this popup: current location, sensors, services and etc.
- Maps – allows changing currently used map: OSM, Google, Bing, Mapbox, Yandex or any other custom TMS or WMS maps.
- Last available object image.
- Google Maps Street View.
- Bottom panel – displays a list of all available sensors, connection time, object information, addresses., graphs and messages.
Top panel
Top panel is used to quickly access sections (Settings, Reports and Object control, Chat and other).

- About – allows to check which version of software you are currently using.
- Help – redirects to this manual.
- Settings – settings menu allows to add new objects, events and etc.
- Dashboard – common statistics.
- Show point – focus map on entered coordinates.
- Search address – helpful and easy to use tool for searching address on map.
- Reports – allows to create various reports.
- Tasks – manage tasks, useful feature for drivers.
- RFID and iButton logbook – review RFID and iButton activity.
- DTC – diagnostic trouble codes.
- Maintenance – manage all available maintenance records.
- Expenses – keep all records related to vehicle maintenance costs.
- Object control – allows sending SMS and GPRS commands to the GPS device.
- Image gallery – allows to receive images with location from GPS devices.
- Chat – allows to send and receive text messages from supported devices. Currently works with Android GPS tracker app.
Left panel
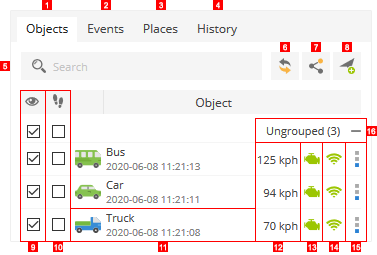
Objects list tab allows to view available objects, find them on the map, view object route history, and edit object settings.

- Objects tab – view current objects status.
- Events tab – history of events can be viewed (overspeending, entering or leaving zones and etc.).
- Places tab – allows to create, edit and delete zones and markers.
- History tab – view history, create reports, export them to various formats etc.
- Search – allows find objects by name.
- Reload – reloads objects list.
- Share position – share direct access to object on map, no authentication required.
- Add object – allows to add a new object.
- Visibility checkbox – turns on or off objects visibility on map.
- Follow checkbox – centers marked object in the middle of the screen every time GPS device has refreshed its position, if multiple objects selected – map zooms the way that all of them remain visible.
- Object information – object name, date and time of last received location.
- Speed indicator – shows current object speed.
- Ignition (ACC) indicator – shows ignition state. Ignition (ACC) sensor should be configured in order to use this feature.
- GPRS indicator – shows GPRS and GPS status.
- Grey icon – no GPRS and GPS.
- Orange icon – no GPS signal.
- Green icon – GPRS and GPS are OK.
- Quick access – allows to see object history, control objects using commands and edit object settings.
Object details panel
This panel allows to view more details about selected object. Panel only appears if Objects, Events or History tab is selected in left panel.

- Altitude – object height over sea level.
- Angle – current object angle (0 – 360° clockwise movement).
- Nearest zone – distance from current point to nearest created zone (learn more about zones).
- Odometer – object odometer readings.
- Plate – predefined object plate number (learn more about object settings).
- Position – coordinates of current object location.
Account panel
In account panel you can change interface language, order premium plan, see logged user e-mail (click to edit user details), switch to mobile version and exit system using logout button.

Bottom panel displays object data, history graph and location messages table.


To remove multiple objects do next:
- Mark objects by clicking checkbox on the left.
- Proceed action in
action menu located at the bottom of settings window.
- Choose
Delete.
- Confirm action which will be applied to all selected objects.
Learn more about features in history section.
Map
Map shows GPS tracker location (learn more about object configuration). To see more details about object, such as address, speed, altitude, angle, time and more, click on object in object list panel.


Map context menu
Press right mouse button on map to access context menu.

 Street view – opens new window with Google street view of selected location.
 Route to point – calculates fastest route from current object location to selected point. To use this feature, object must be selected in left panel. Calculated route later can be used to trigger event.
Note: feature uses free external service, which sometimes might be overloaded and will give no response, during that time route to point feature won’t work. It might take some time to start working again.
 New marker – place new marker in selected place.
 New route – draw route.
 New zone – draw zone.


