Main functionality located in settings section – add, edit, duplicate objects and related elements, add object groups, drivers, sensors, events. Set up user interface and create sub accounts.
Settings section located in top panel, press ![]() settings button as shown below:
settings button as shown below:

Objects management
Object list section
This section allows to manage objects and check object expiration date.
In objects section all account objects are listed, object IMEI, expiration date and object control features.

Objects management
Object list section
This section allows to manage objects and check object expiration date.
In objects section all account objects are listed, object IMEI, expiration date and object control features.
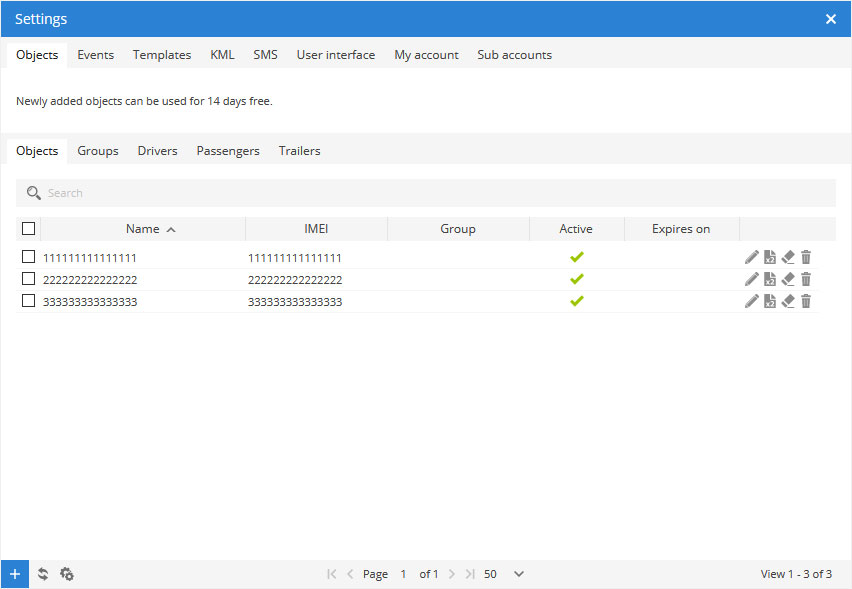

![]() edit – change object settings.
edit – change object settings.![]() duplicate – creates object copy with the same details except name and IMEI.
duplicate – creates object copy with the same details except name and IMEI.![]() clear history – removes object history and events entries.
clear history – removes object history and events entries.![]() remove – permanently removes object.
remove – permanently removes object.
To process multiple entries do next:
- Mark entries by clicking checkbox on the left.
- Proceed action in
 action menu located at the bottom of settings window.
 - Choose option
 Clear history or
  Delete.
 - Confirm action which will be applied to all selected entries.
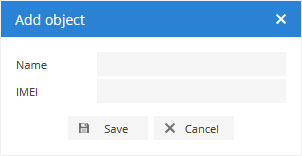
Add new object
To add new object do next:
- Go to
 Settings menu located in top panel.
 - In Objects tab left bottom corner press
 button.
 - Add object window will appear.
- Enter object name and IMEI.
Edit object
To edit object do next:
- Go to Settings menu located in top panel.
- In Objects tab choose object to edit and click
 edit object icon on the right side.
 - Edit object window will appear.
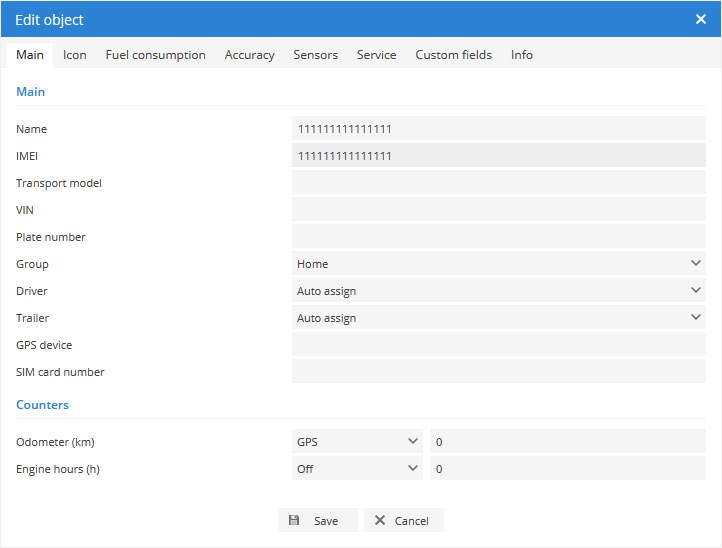
- Name – object name.
- IMEI – GPS device IMEI number.
- Transport model – for example: BMW 750.
- VIN – vehicle VIN number.
- Plate number – vehicle plate number.
- Group – assign object to a predefined group.
- Driver
- No driver – disable feature.
- Auto assign – should be selected if driver change detection is configured with RFID/iButton sensor. With auto assign, system will automatically detect driver according to RFID/iButton parameters.
- Driver name – predefined driver name.
- Trailer
- No trailer – disable feature.
- Auto assign – should be selected if trailer change detection is configured with RFID/iButton sensor. With auto assign, system will automatically detect trailer according to RFID/iButton parameters.
- Trailer name – predefined trailer name.
- GPS device – allows to write device model (not mandatory).
- SIM card number – enter SIM card number.
- Odometer (km) – you can set how many kilometres vehicle drove.
- Off
- GPS – calculates distance using GPS location points. It is not a precise tool, results of vehicle odometer and system may vary.
- Sensor – system will get data from device sensor.
- Engine hours (h) – you can set how many hours engine worked.
- Off
- ACC – calculates engine hours using Ingnition sensor. It is not a precise tool, results of vehicle engine hours and system may vary.
- Sensor – system will get data from device sensor.
Icon
Fuel consumption
Note: system fuel consumption statistics may vary from real fuel consumption of your vehicle. In order to receive fuel consumption statistics in your reports you need to set fuel consumption parameters.
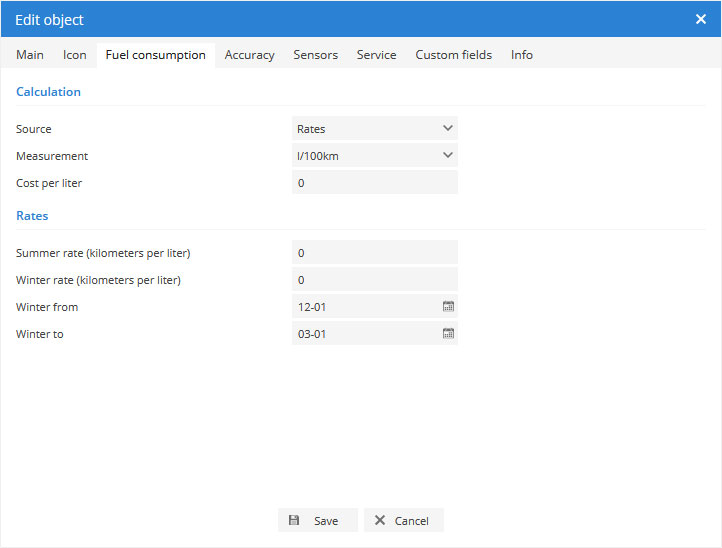
Calculation
- Source
- Rates – calculation will be made according to rates below.
- Fuel level – calculation will be made according to set fuel level sensor.
- Fuel consumption – calculation will be made according to set fuel consumption sensor.
- Measurement – choose units.
- Cost per liter – enter liter/gallon cost, currency can be set in user interface section.
Rates
- Summer rate (kilometers per liter) – enter amount of kilometers which car can travel using one liter during summer period.
- Winter rate (kilometers per liter) – enter amount of kilometers which car can travel using one liter during winter period.
- Winter from – the beginning of winter period.
- Winter to – the end of the winter period.
Accuracy
In edit object window click on Accuracy tab. This section allows to accurately adjust GPS device data.
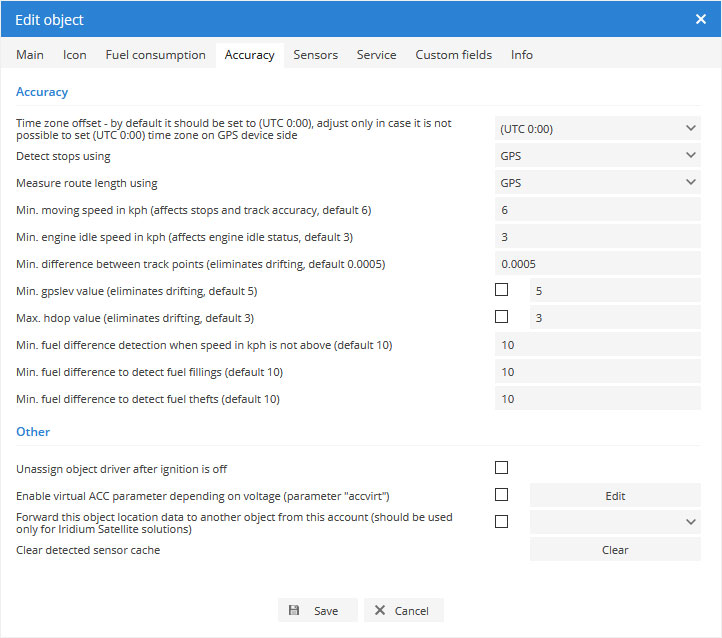
- Time zone offset – by default it should be set to (UTC 0:00), adjust only in case it is not possible to set (UTC 0:00) time zone on GPS device side.
- Detect stops using:
- GPS – calculates stops using GPS location points.
- ACC – calculates stops according to ignition sensor state, ignition sensor must be set up properly. Learn more about sensor parameters.
- GPS + ACC – stops are being calculated according to both options.
- Min. moving speed in km/h – set minimum movement speed. Very important to set proper value if object is moving slowly (example: walking).
- Min. engine idle speed in km/h – minimum idle speed, below which idle status will be detected.
- Min. difference between track points – this option helps to eliminate inaccurate GPS device location points (drifting).
- Min. gpslev value – location point filtering according to GPS signal strength.
- Max hdop value – location point filtering according to horizontal dilution of precision.
- Min. fuel difference detection when speed in not above (default 10) – software will detect fuel filling or theft if speed is under set value (default 10 km/h). Settings allow preventing false detection of fuel thefts and fillings while driving. These settings are important to have accurate results in reports.
- Min. fuel difference to detect fuel fillings (default 10 %) – allows to set minimum amount (in percents) when sensor data changes will be recognized as fuel filling. (Example: if fuel level rises by 10% or more, it will be recognized as fuel filling). Note: In order to use this option, you must configure fuel sensor properly.
- Min. fuel difference to detect fuel thefts (default 10 %) – allows to set minimum amount (in percents) when sensor data changes will be recognized as fuel theft. (Example: if fuel level drops by 10% or more, it will be recognized as fuel theft). Note: In order to use this option, you must configure fuel sensor properly.
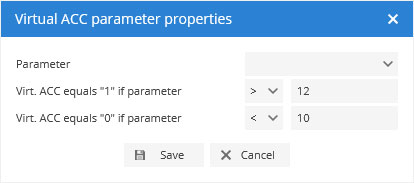
- Enable virtual ACC parameter depending on voltage (parameter “accvirt”)– allows to configure ignition sensor based on voltage parameters.
- Forward this object location data to another object from this account (should be used only for Iridium Satellite solutions)
- Clear detected sensor cache – clears all detected device sensors.
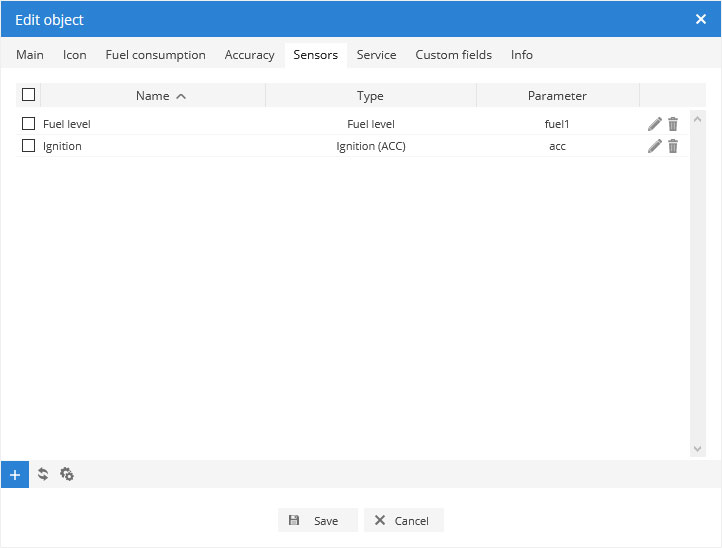
Sensors
Sensors section allows to add GPS device sensors and assign them to objects. There are many types of sensors which can be widely used. When configuring sensor, the choice of sensor type depends on device model and its principle of operation. For more details refer to GPS device user manual.
To process multiple entries do next:
- Mark entries by clicking checkbox on the left.
- Proceed action in action menu located at the bottom of settings window.
- Choose option
 Import,
  Export or Delete.
 - Confirm action which will be applied to all selected entries.
To add sensors do next:
- Go to Settings menu located in top panel,
- Choose object and click on edit object button.
- In Edit object window go to Sensors tab.
- In left bottom corner press button.
- Sensor properties window will appear.
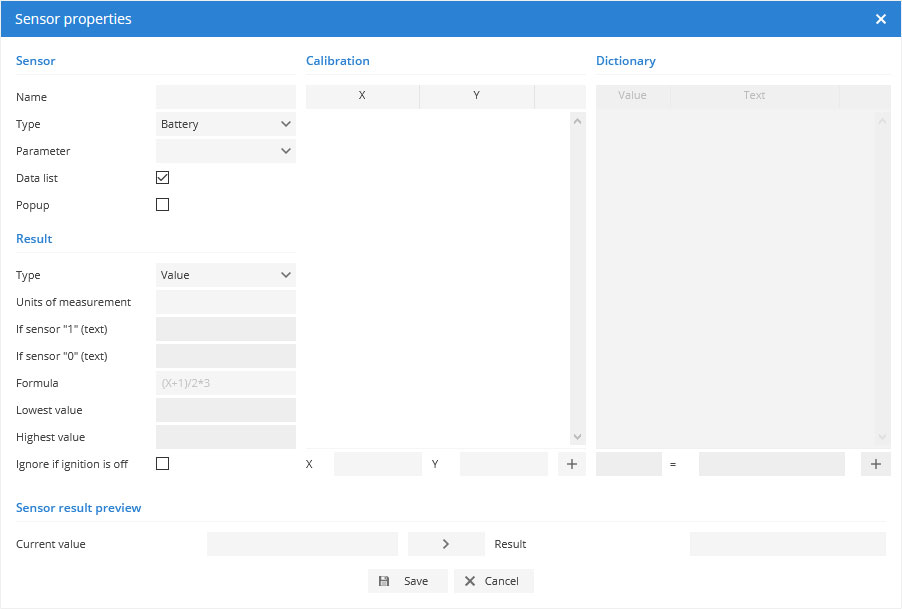
Sensor
- Name – sensor name.
- Type – sensor type that is suitable for the specific task. Note: for correct sensor type refer to GPS device user manual.
- Digital input – displays device sensor value 1 or 0 (enables input fields to enter sensor state text).
- Digital output – displays device sensor value 1 or 0 (enables input fields to enter sensor state text).
- Driver assign – this sensor type allows to receive string from RFID or iButton devices. Received string will be checked in system. As a result, information will be seen, which driver is using vehicle. Note: Auto assign must be set in object settings.
- Engine hours – receives engine hours value.
- Fuel level – this option requires to specify result type (value or percentage) depending on device information result. For more details refer to GPS device user manual.
- Fuel consumption – receives total fuel consumption or consumption between two points.
- Ignition (ACC) – displays device sensor value 1 or 0 (enables input fields to enter sensor state text).
- Odometer – receives total odometer or odometer between two points.
- Passenger assign – this sensor type allows to receive string from RFID or iButton devices. Received string will be checked in system. As a result, information will be seen, which passenger is using vehicle. Note: Auto assign must be set in object settings.
- Temperature – receives temperature value.
- Trailer assign – this sensor type allows to receive string from RFID or iButton devices. Received string will be checked in system. As a result, information will be seen, which trailer is connected to vehicle. Note: Auto assign must be set in object settings.
- Custom – allows to enter any necessary sensor information. For more details refer to GPS device user manual.
- Parameter – sensor parameter, refer to sensor parameters section for more details.
- Data list – sensor will be shown in popups on map.
- Popup – sensor will be shown in object details panel.
Result
- Type – option depends on chosen sensor type.
- Logic – allows to enter text depending on sensor value.
- Value – this option requires to specify result units of measurement (for example: kg, liters…) and formula (if applicable).
- Percentage – this option requires to specify result lowest and highest values.
- Absolute – total value.
- Relative – value between location points.
- Units of measurement – value depending on sensor type (example: liters, gallons, volts…)
- If sensor “1” (text) – allows to show custom text if result value is 1 (example: if sensor is used to monitor engine state, than if engine is running, text could be ON).
- If sensor “0” (text) – allows to show custom text if result value is 0 (example: if sensor is used to monitor engine state, than if engine is not running, text could be OFF).
- Formula – in some cases need to perform device result calculations to get precise value. Note: for more details refer to your GPS device user manual. In formula field you can multiply, divide, add, subtract, use brackets. X means value which was sent by device.
Depending on sensor and result type parameters you will be able to enter lowest and highest values. This option allows to configure value range. Example: if need to monitor vehicle fuel level and GPS device is sending volts instead of real capacity, we need to know voltage of empty and full fuel tank (example: empty tank: 3 volts, full tank: 10 volts, according to these values: lowest value: 3, highest value: 10).
- Lowest value – lowest sensor value.
- Highest value – highest sensor value.
- Ignore if ignition is off – in some cases this solves fuel level drops when vehicle is not running.
Sensor result preview
Final sensor value preview.
Calibration
This section can be used with Fuel level, Temperature and Custom sensor type. Calibration allows you to set precise parameters of the sensor. Widely used to calculate fuel tank readings or convert sensor voltage to temperature values.
Example 1: Fuel tank
Different places Inside of the fuel tank may be wider or narrower and to get more accurate data you should use calibration.
In order to perform a more precise measurement of fuel tank, it is necessary to measure fuel tank sensor voltage width different fuel level. The system allows you to set up to 50 points, the more points you specify, the more accurate readings you will get.
Directions: Drain the fuel tank, write down the fuel sensor voltage readings, fill the tank with 5 liters/gallons of fuel, make a note of the fuel sensor voltage readings and so on until the tank is full.
Program will calculate fuel amount according to fuel sensor values.
Example of fuel sensor results:
- Empty tank – 2 volts
- 5 liters tank – 3 volts
- 10 liters – 4 volts
- 15 liters – 5 volts
- …
- 60 liters – 14 volts
Follow these steps to enter data correctly:
- Choose sensor type: Fuel level
- Choose result type: Value
- Enter units of measurement: liters or gallons
- In calibration X field: 2
- In calibration Y field: 0
- Click add button
- In calibration X field: 3
- In calibration Y field: 5
- Click add button
- In calibration X field: 4
- In calibration Y field: 10
- Click add button
- …
- Save sensor
Example 2: Temperature sensor
If temperature sensor sends volts instead of temperature values, then it is possible to convert results.
In this case we need to know temperature sensor voltage at its lowest and highest states.

- -40 degrees – 3 volts
- 40 degrees – 7 volts
Program will calculate exact temperature according to set values.
Follow these steps to enter data correctly:
- Choose sensor type: Temperature or Custom
- Choose result type: Value
- Enter units of measurement: (according to example, you should use degrees)
- In calibration X field: 3
- In calibration Y field: -40
- Click add button
- In calibration X field: 7
- In calibration Y field: 40
- Click add button
- Save sensor
Dictionary
Dictionary allows to assign text to particular parameter value. Text will be visible in object details panel and popup which appears on map.
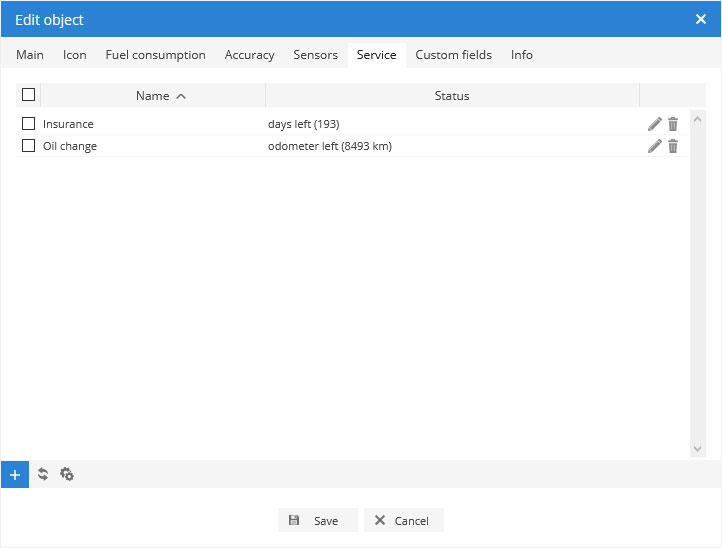
Service
Service allows to set a reminder about vehicle maintenance work (example: change engine oil, insurance expiration).
To process multiple entries do next:
- Mark entries by clicking checkbox on the left.
- Proceed action in action menu located at the bottom of settings window.
- Choose option Import, Export or Delete.
- Confirm action which will be applied to all selected entries.
To add reminder entries do next:
- Go to Settings menu located in top panel,
- Select object and click on edit object button.
- In Edit object window click Service tab.
- In left bottom corner press button.
- Service properties window will appear.

Service
Name – service name (example: Change engine oil).
Calculations are made according to odometer results:
- Odometer interval (km) – distance after which service must be applied.
- Last service (km) – enter distance when the last time service was done.
Calculations are made according to engine run time:
- Engine hours (h) – time interval after which service must be applied.
- Last service (h) – enter the last time service was done.
Calculations are made according to days:
- Days interval – number of days after which service must be applied.
- Last service – choose last service date.
Trigger event
- Odometer left (km) – event will be triggered if chosen distance reached, option available only if Odometer interval (km) is checked.
- Engine hours left (h) – event will be triggered if chosen time reached, option available only if Engine hours interval (h) is checked.
- Days left – event will be triggered if specified days reached, option available only if Days interval is checked.
- Update last service – automatically updates information.
Current object counters
- Current odometer (km) – current odometer results.
- Current engine hours (h) – current engine hours results.
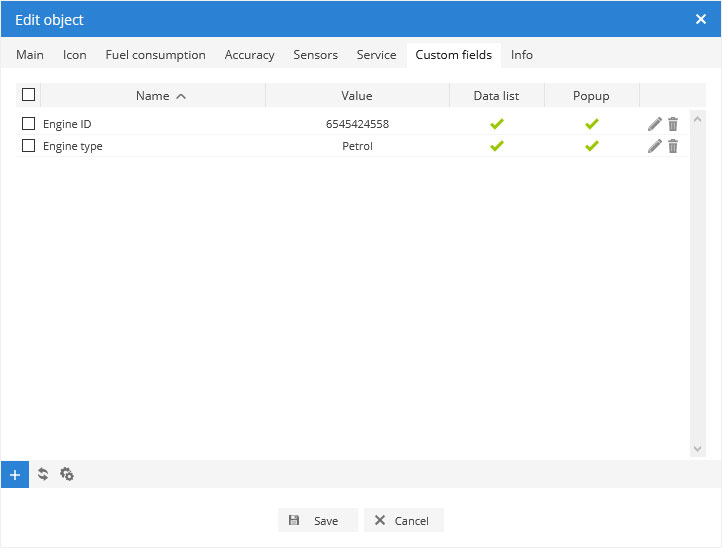
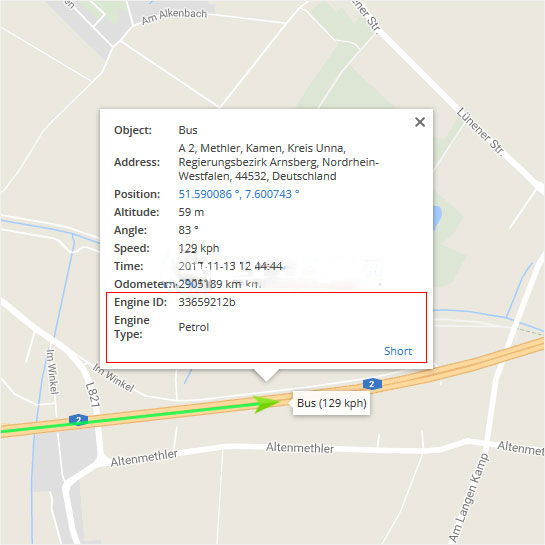
Custom fields
Additional information can be added to object.
To process multiple entries do next:
- Mark entries by clicking checkbox on the left.
- Proceed action in action menu located at the bottom of settings window.
- Choose option Import, Export or Delete.
- Confirm action which will be applied to all selected entries.
Custom field data can be seen in object details popup. Click object cursor (icon) located on map.
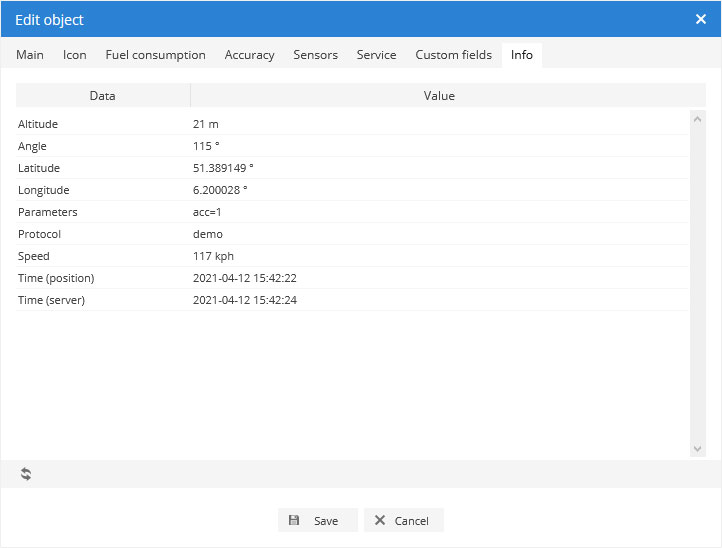
Info
More details about object, coordinates, speed, time and device protocol information.
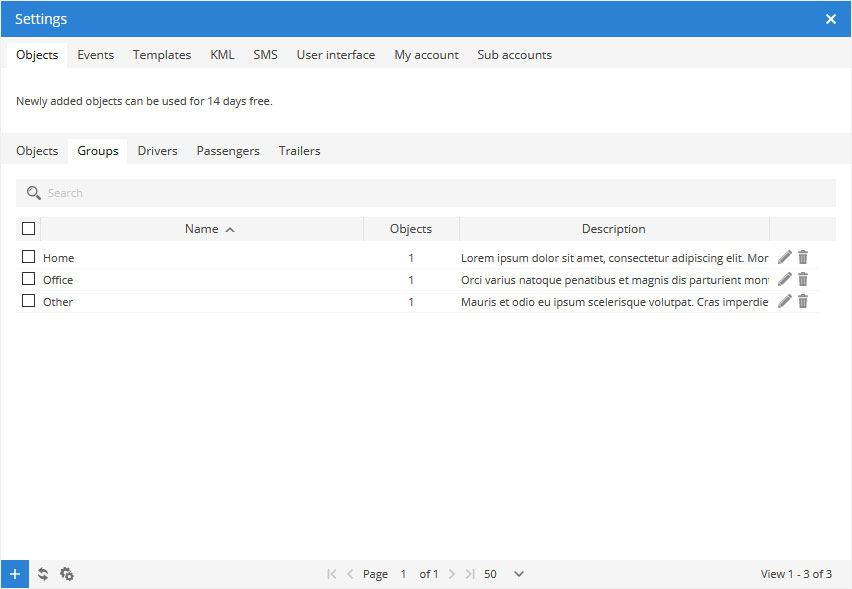
Add object group
This section allows to group objects. This feature is useful managing large amount of objects.
To process multiple entries do next:
- Mark entries by clicking checkbox on the left.
- Proceed action in action menu located at the bottom of settings window.
- Choose option Import, Export or Delete.
- Confirm action which will be applied to all selected entries.
To add new group do next:
- Go to Settings menu located in top panel,
- Select object and click on edit object button.
- In Objects window click Groups tab.
- In left bottom corner press button.
- Object group properties window will appear.
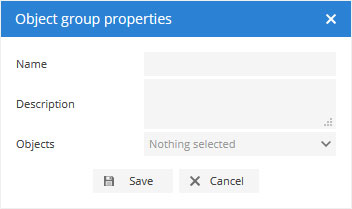
In object group properties window enter group name, description (if necessary) and assign objects.
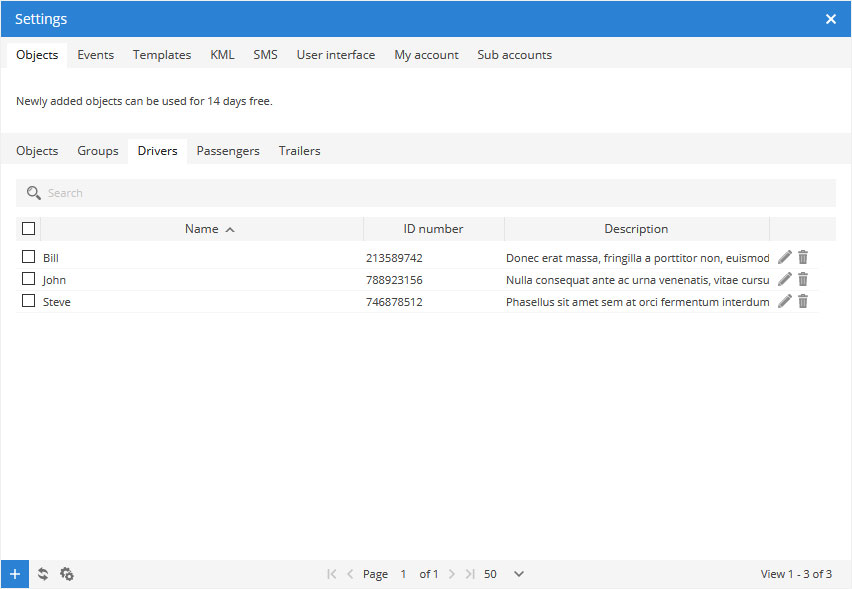
Add driver
This section allows to add drivers and assign them to object. Drivers section purpose is to identify and collect information about person who was using object. Driver information can be seen in object details panel (note: object details panel only appears if Objects, Events or History tab is selected in left panel.). Driver name is available in reports.
Object drivers can be configured to get information about object driver changes. Example: if driver John is using vehicle and after some time he is changed by another driver who’s name is Tom, these changes can be sent to system (GPS device must be configured with iButton or RFID device).
To process multiple entries do next:
- Mark entries by clicking checkbox on the left.
- Proceed action in action menu located at the bottom of settings window.
- Choose option Import, Export or Delete.
- Confirm action which will be applied to all selected entries.
To add new driver do next:
- Go to Settings menu located in top panel,
- Select object and click on edit object button.
- In Objects window click Drivers tab.
- In left bottom corner press button.
- Object driver properties window will appear.
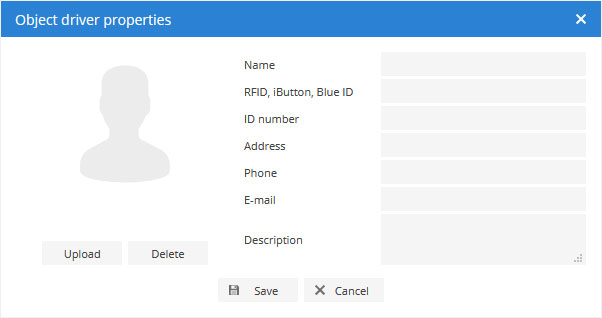
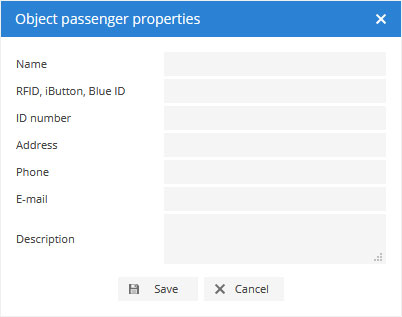
In object driver properties window enter driver name, other fields are not mandatory.
- Image – upload/delete driver photo.
- Name – driver name that will be visible in reports.
- RFID or iButton – enter iButton or RFID unique ID number for driver identification.
- ID number – enter ID number to identify the driver.
- Address, Phone, E-mail, Description – fill additional fields if necessary.
Add passenger
This section allows to add passengers which can be detected with RFID/iButton. Section purpose is to collect information about passengers. Driver information can be seen in object details panel (note: object details panel only appears if Objects, Events or History tab is selected in left panel.). Passenger name is available in reports. In order to use this feature Passenger assign sensor must be configured.
Object passengers can be configured to get information about passenger changes (GPS device must be configured with iButton or RFID device).

To process multiple entries do next:
- Mark entries by clicking checkbox on the left.
- Proceed action in action menu located at the bottom of settings window.
- Choose option Import, Export or Delete.
- Confirm action which will be applied to all selected entries.
To add new passenger do next:
- Go to Settings menu located in top panel,
- Select object and click on edit object button.
- In Objects window click Passengers tab.
- In left bottom corner press button.
- Object passenger properties window will appear.
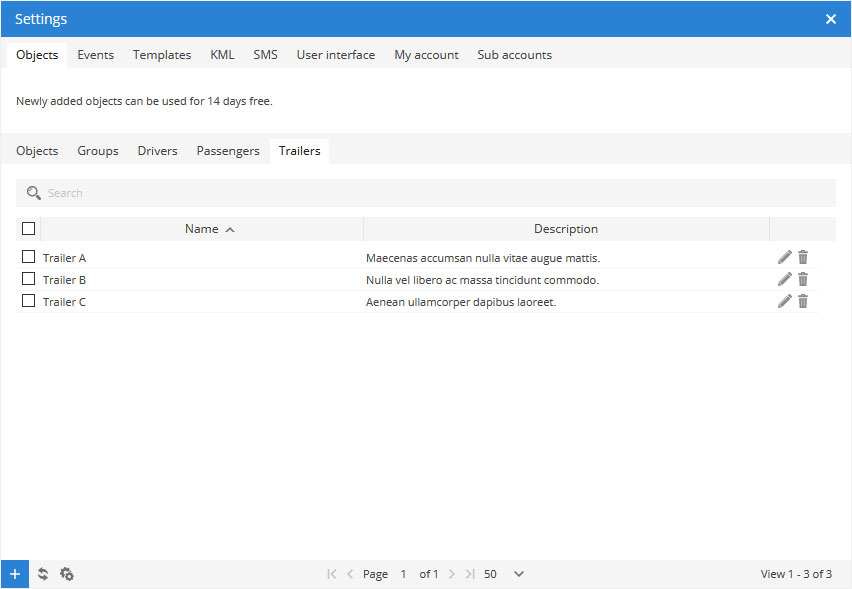
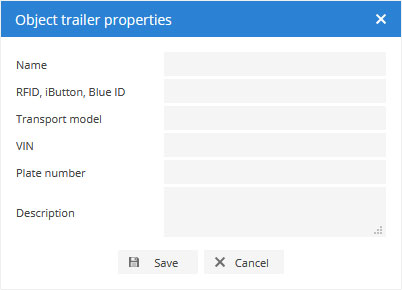
Add trailer
This section allows to add trailers and assign them to object. Trailers section purpose is to identify and collect information about trailer changes. Trailer information can be seen in object details panel (note: object details panel only appears if Objects, Events or History tab is selected in left panel.). Trailer name is available in reports. GPS device must be configured with iButton or RFID device.
To process multiple entries do next:
- Mark entries by clicking checkbox on the left.
- Proceed action in action menu located at the bottom of settings window.
- Choose option Import, Export or Delete.
- Confirm action which will be applied to all selected entries.
To add new trailer do next:
- Go to Settings menu located in top panel,
- Select object and click on edit object button.
- In Objects window click Trailers tab.
- In left bottom corner press button.
- Object trailer properties window will appear.
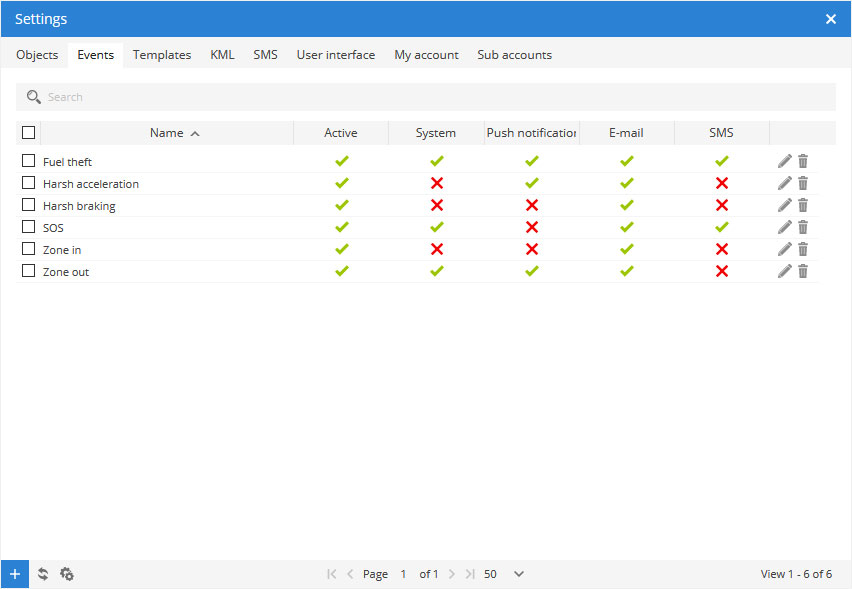
Events management
Events is one of the most important feature which our software offers. Events are used to trigger actions by important or disruptive activities. Customer will get instant SMS/e-mail notifications triggered by different event types.
To process multiple entries do next:
- Mark entries by clicking checkbox on the left.
- Proceed action in action menu located at the bottom of settings window.
- Choose Delete.
- Confirm action which will be applied to all selected entries.
Create event
To create new event do next:
- Go to Settings menu located in top panel.
- Click Events tab.
- In left bottom corner press button.
- Event properties window will appear.
Event section features are located in tabs depending on feature type.
Main settings
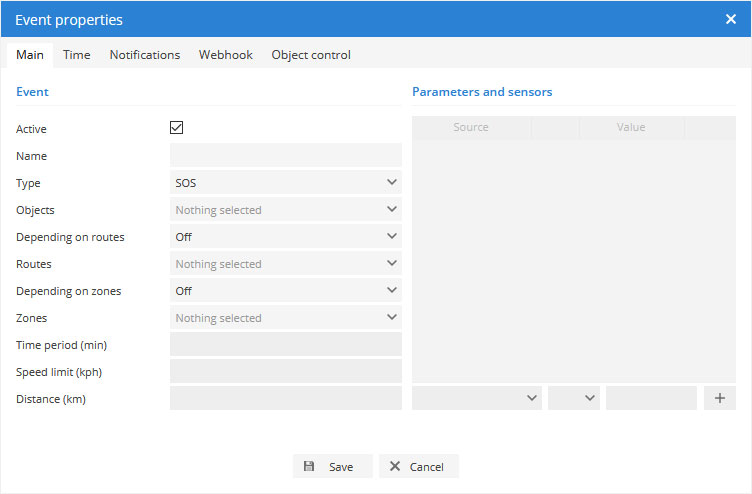
- Active – Turns on and off event. Useful if you don’t want to receive event messages but want to keep event for further usage.
- Event name – event name that will be displayed in events list.
- Event type – current system version supports these events:
Events listed below must be supported by GPS device:
- SOS – notification of SOS alarm button is pressed on the object.
- Bracelet on – event is triggered if handcuffs are fastened.
- Bracelet off – event is triggered if handcuffs are opened.
- Dismount – event is triggered if device is dismounted.
- Disassemble – event is triggered if device is disassembled.
- Door – event is triggered if device detects open door.
- Man down – event is triggered if object lies on the ground (mostly used to monitor people body position).
- Shock – event is triggered if GPS device was shaked.
- Tow – event will be sent if GPS device detects object movement with turned off ignition.
- Power cut – event is triggered if GPS device power leads were disconnected.
- GPS antenna cut – event is triggered if device GPS antenna is cut, not connected or broken.
- Signal jamming – event is triggered if GPS device detects signal jamming.
- Low DC – event is triggered if GPS device DC (direct current) is too low.
- Low battery – event is triggered if battery voltage is too low.
- Harsh acceleration – event is triggered if GPS device detects sudden object acelereration.
- Harsh braking – event is triggered if GPS device detects sudden object braking.
- Harsh cornering – event is triggered if GPS device detects sudden object cornering.
- Parameter – event is triggered if parameter received from device meets set condition.
- Sensor – event is triggered if sensor meets set conditions.
- DTC (Diagnostic Trouble Codes) – event is triggered if device sends DTC error codes to server.
Events listed below are independent from GPS device:
- Connection yes – event is triggered if GPRS connection with GPS device was established.
- Connection no – event is triggered if GPRS connection with GPS device was lost.
- GPS yes – event is triggered if connection with GPS device was established.
- GPS no – event is triggered if connection with GPS device was lost.
- Stopped – event is triggered if GPS device is standing longer than set period of time.
- Moving – event is triggered if GPS device is moving longer than set period of time.
- Engine idle – event is triggered if GPS device engine is idling longer than set period of time.
- Overspeed – object exceeded predefined speed.
- Underspeed – object have slowed down below the specified speed.
- Driver change
- Trailer change
- Service – allows to set a reminder about vehicle maintenance work (example: change engine oil).
- Proximity – allows to detect if two objects are close to each other.
- Route in – object crossed predefined route.
- Route out – object distanced from predefined route.
- Zone in – object entered zone.
- Zone out – object left zone.
- Time period (min) – event will be triggered if chosen event type lasts for set period of time.
- Speed limit (kph) – sets speed limit, works with overspeed and underspeed events.
- Parameters and sensors – trigger event regarding sensor condition.
- Objects – select objects which data will be used to trigger events.
- Trigger event depending on routes
- Off – disable dependency.
- In selected routes – event will be triggered if object goes into selected route.
- Out of selected routes – event will be triggered if object goes out of selected route.
- Select routes – select route from list (learn how to create routes). For multiple selection keep “Ctrl” button pressed.
- Trigger event depending on zones
- Off – disable dependency.
- In selected zones – event will be associated only to selected zones.
- Out of selected zones – event will be associated to all zones except selected ones.
- Selected zones – select zone from list (learn how to create zone). For multiple selection keep “Ctrl” button pressed.
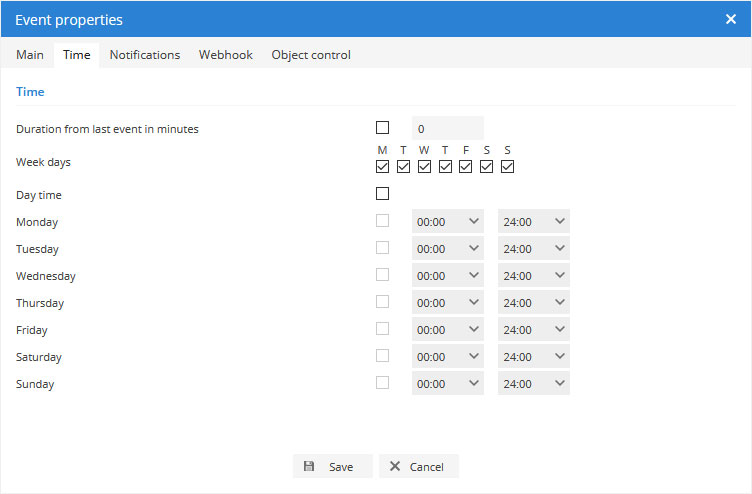
Time
Event time settings allows to choose exact day and time when event will be active.
- Duration from last event in minutes – next event will be triggered only after set period of time.
- Week days – event will be active only on chosen days.
- Day time – event will be active in set period of time.
Notifications
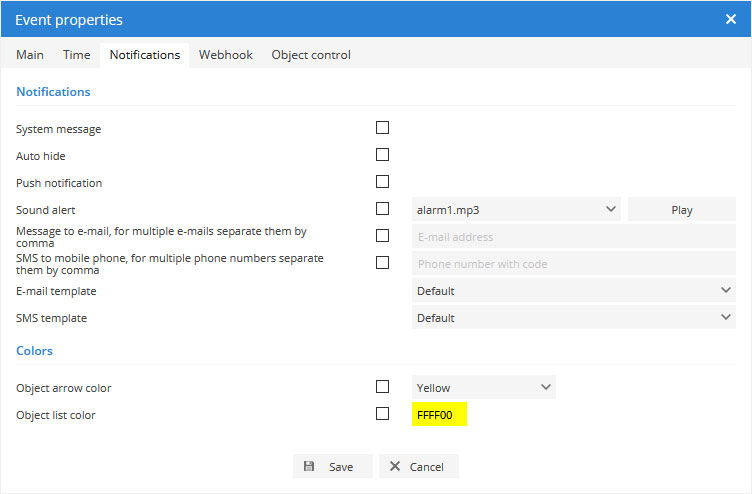
- System message – turns on and off system message. Note: system message will be seen only in used browser window.
- Auto hide – automatically hide message after some period of time.
- Push notification – feature is compatible with Android devices. Push notification is a type of message which is shown by Android OS itself. In order to receive push notifications, feature must be enabled in GPS Server Mobile Android app settings.
- Sound alert – choose notification sound.
- Message to e-mail box – turns on and off message to e-mail which is triggered by selected event. Note: notification may be sent to different e-mails, separate e-mail addresses with comma.
- SMS to mobile phone – sends event message via SMS. Note: SMS gateway must be configured.
- E-mail template – choose template, which will be used for e-mail notifications. E-mail templates can be created in settings, templates tab.
- SMS template – choose template, which will be used for SMS notifications. SMS templates can be created in settings, templates tab
Colors
- Object arrow color – as soon as event is triggered, object arrow color will be changed.
- Object list color – as soon as event is triggered, object color in left panel object list will be changed.
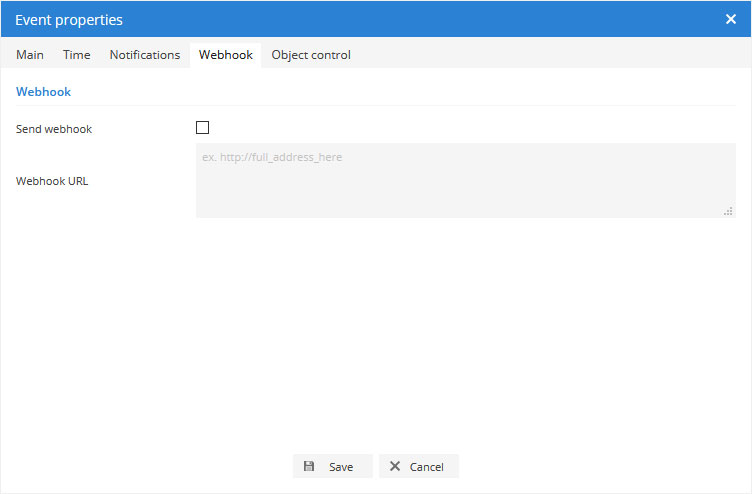
Webhook
Webhook allows to pass event parameters to external source via HTTP GET method.
Available parameters:
- account username
- event type
- description
- IMEI
- object name
- server date
- tracker date
- latitude
- longitude
- altitude
- angle
- speed
Object control
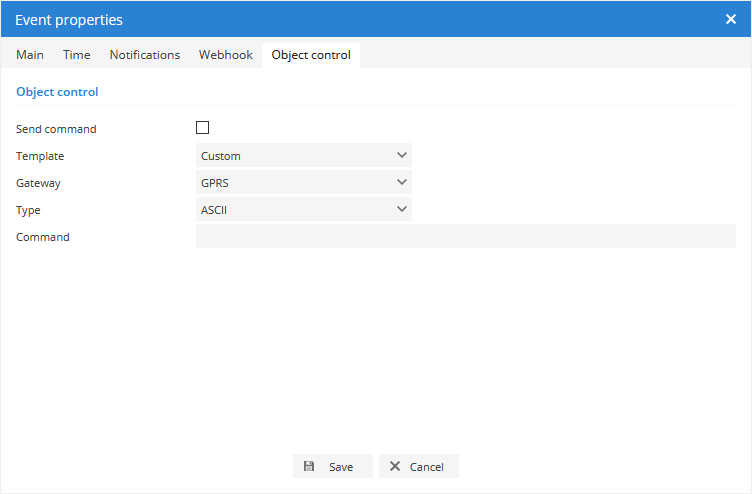
- Send command – read service manual of your GPS device to get all available commands.
- Gateway – GPRS or SMS, choose appropriate type according to tracking device manual.
- Type – ASCII or HEX, choose appropriate type according to tracking device manual.
- Command – enter command according to your device manual.
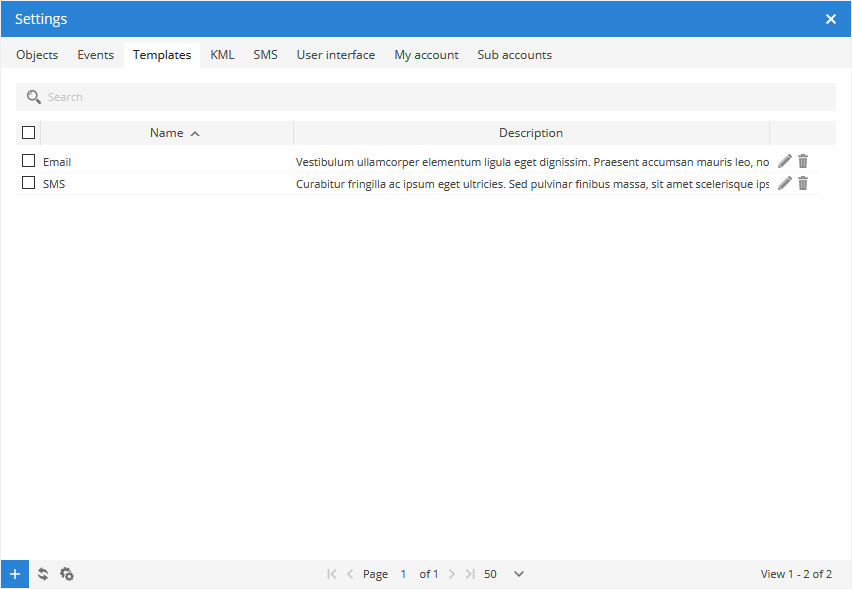
Templates
Templates section allows to create templates for e-mail and SMS notifications.
To process multiple entries do next:
- Mark entries by clicking checkbox on the left.
- Proceed action in action menu located at the bottom of settings window.
- Choose option Import, Export or Delete.
- Confirm action which will be applied to all selected entries.
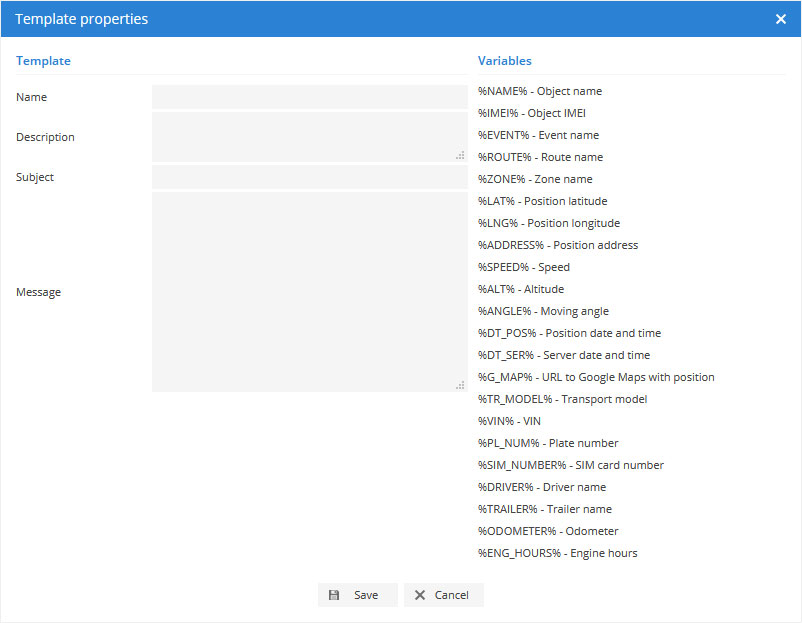
To create template do next:
- Go to Settings menu located in top panel.
- Click Templates tab.
- In left bottom corner press button.
- Template properties window will appear.
KML

To process multiple entries do next:
- Mark entries by clicking checkbox on the left.
- Proceed action in action menu located at the bottom of settings window.
- Choose Delete.
- Confirm action which will be applied to all selected entries.
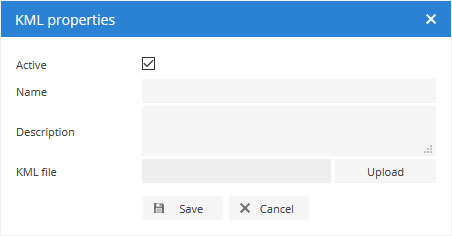
To create new record do next:
- Go to Settings menu located in top panel.
- Click KML tab.
- In left bottom corner press button.
- KML properties window will appear.
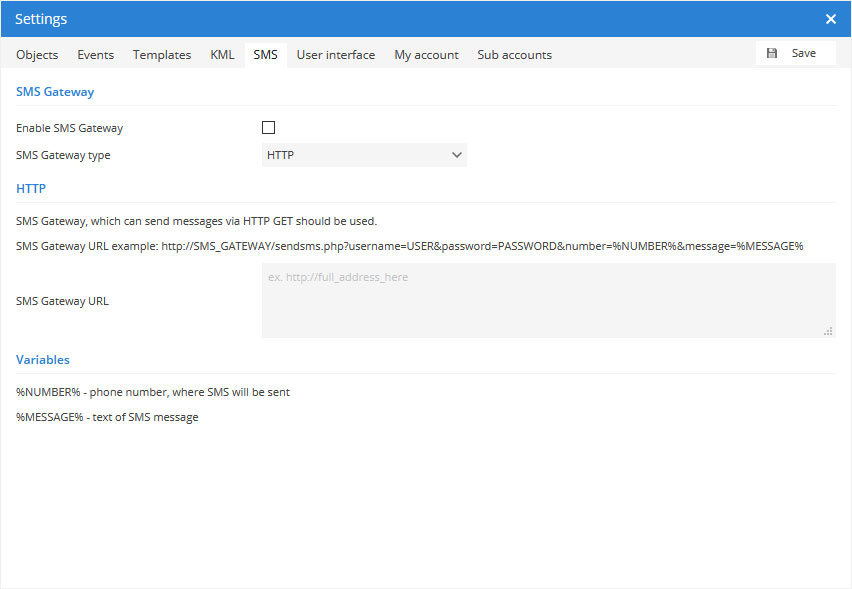
SMS
Each account owner can use independent SMS gateway server.
SMS gateway type – mobile application or HTTP.

SMS
Each account owner can use independent SMS gateway server.
SMS gateway type – mobile application or HTTP.
Chat
New chat message sound alert – choose chat message sound.
Map
Remember last map position – every time you login to system user interface map will be in the same place you left it (this option requires browser to accept cookies).
Map startup position
Default – default software settings.
Remember last – every time you login to system user interface map will be in the same place you left it (this option requires browser to accept cookies).
Fit objects – map will be automatically zoomed so all objects will be seen in view port.
Map icon size
History route color – color of route viewed in history.
History route highlight color – color of highlighted route viewed in history.
Groups
Collapsed – choose which groups will stay collapsed by default.
Object list
Details
Time (position) – In object list panel last known GPS location time will be shown.
Time (server) – In object list panel last communication time between GPS device and server will be show.
Status – In object list panel GPS device status will be show: moving, stopped, idle or offline.
Other
Language – user interface language.
Unit of distance – select miles or kilometers as distance measuring units.
Unit of capacity – select liters or gallons as capacity measuring units.
Unit of temperature – select Celsius or Fahrenheit as temperature measuring scale.
Currency – currency appears with fuel consumption cost.
Time zone – Indicate your time zone accurately because all time values are displayed in accordance with time zone selected. Make sure that your GPS device time zone is set to 0 UTC.
Daylight saving time (DST) – or summer time is the practice of advancing clocks during summer months by one hour so that evening daylight lasts an hour longer, while sacrificing normal sunrise times. Typically, regions with summer time adjust clocks forward one hour close to the start of spring and adjust them backward in the autumn to standard time. Set beginning and end date when additional time will be added to time zone.
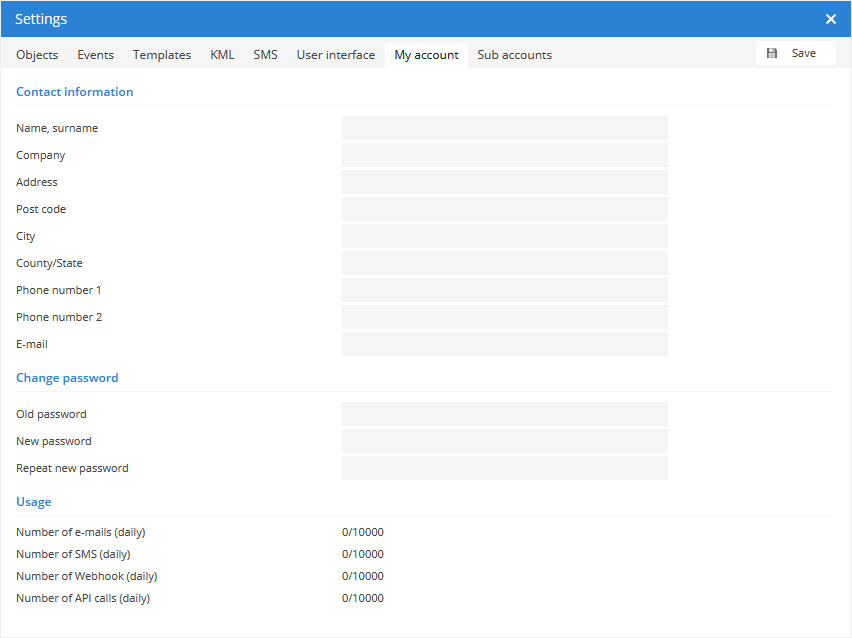
My account
My account section allows to enter personal information and change account password.
Sub accounts
Sub accounts allows to split main account into smaller accounts with limited privileges, assign only particular objects and zones.
To process multiple entries do next:
- Mark objects by clicking checkbox on the left.
- Proceed action in action menu located at the bottom of settings window.
- Choose Delete.
- Confirm action which will be applied to all selected entries.
To create sub account do next:
- Go to Settings menu located in top panel.
- Click Sub accounts tab.
- In left bottom corner press button.
- Sub account properties window will appear.
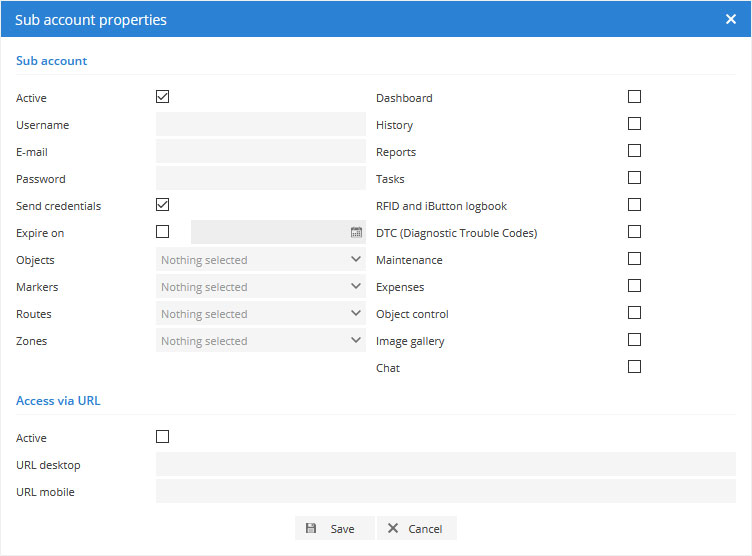
Sub account
- Active – turn sub account on or off.
- Username – sub account user name.
- E-mail – set e-mail that will be used to login to sub account.
- Password – set password for sub account.
- Send credentials – choose whether or not to send email with sub account credentials.
- Expire account – set account expiration date. At due date account will become inactive.
Privileges
Forbid or allow sub account owner to access features below:
- History – allow sub account user to view history section.
- Reports – allow sub account user to view reports section.
- RFID and iButton logbook – allow sub account user to view logbook section.
- DTC (Diagnostic Trouble Codes) – allow sub account user to view DTC section.
- Object control – allow sub account user to view object control section.
- Image gallery – allow sub account user to view image gallery section.
- Chat – allow sub account user to view chat section.
Objects
List of available objects, select one or few that will be monitored in your sub account.
Markers
List of available markers, select one or few that will be monitored in your sub account.
Routes
List of available routes, select one or few that will be monitored in your sub account.
Zones
List of available zones, select one or few (hold “Ctrl” key to select multiple items) that will be monitored in your sub account.
Access via URL
Simple way to access account via URL without need to login, two URLs provided for standard and mobile interface version.
After setting parameters press save. Details of created sub account will be sent to entered E-mail.


